Search
Have an existing account?
Sign In
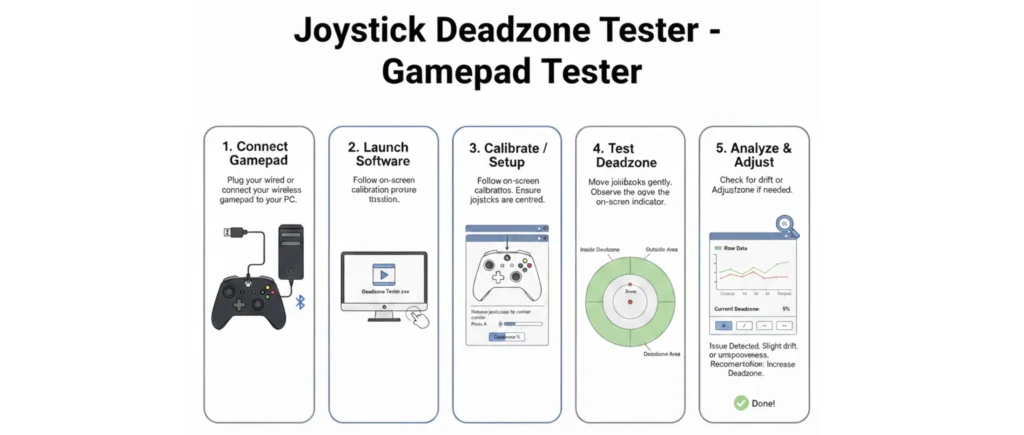
1
Connect Gamepad
Plug your wired or connect your wireless gamepad to your PC.
Ready
2
Launch Software
Follow on-screen calibration process.
Waiting
3
Calibrate / Setup
Follow on-screen instructions. Ensure joysticks are centred.
Waiting
4
Test Deadzone
Move joysticks gently. Observe the on-screen indicator.
Waiting
5
Analyze & Adjust
Check for drift or adjust deadzone if needed.
Waiting
Deadzone
Current Deadzone: 5%
0%
25%
50%
Inside Deadzone
Outside Area
Raw Data
⚠️
Issue Detected. Slight drift or imprecision.
Recommendation: Increase Deadzone.
✓
Done!
Your controller has been tested and optimized.
Controls
Controller: Not Detected
Deadzone Mode
Radial deadzone treats X/Y as a vector; Per-axis uses separate thresholds for X and Y.
Deadzone Value 0.105
0 - 0.5Sensitivity 1.0
0.5 - 2.0Scale raw axis for visualization.
Left Stick
X: 0.000
Y: 0.000
Mag: 0.000
Angle: 360°
Right Stick
X: 0.000
Y: 0.000
Mag: 0.000
Angle: 360°
Controller:
None
Test:
Not Running
Samples:
0
Data Log
Waiting for controller data...
Complete Guide — Understanding Deadzones, Choosing Values & Troubleshooting
What is a deadzone and why it matters
A deadzone is a small threshold around the joystick's center position where inputs are treated as zero. Joysticks are analog devices and their electronic sensors (potentiometers or hall-effect sensors) can output small non-zero values at rest due to manufacturing tolerances, wear, temperature, or electronic noise. A properly chosen deadzone removes this small noise so you don't get unintended movement while preserving the stick's full range of motion for precise control.
Radial vs Per-axis deadzones
Radial deadzone treats the joystick position as a vector and ignores movement inside a circular radius centered at (0,0). This keeps directional sensitivity uniform and is common in many competitive games. Per-axis deadzone applies separate thresholds for X and Y. Per-axis can be helpful if your controller has uneven noise characteristics (for example X is clean but Y is noisy).
How this tool works
This web tool uses the browser's Gamepad API to read axis values from a connected controller. Values are typically in the range -1.0 to +1.0. The script samples axis values at the chosen interval and shows two things: a visual dot representing stick position, and numeric readouts of X, Y, magnitude, and angle. A deadzone overlay visualizes what portion of motion is ignored. The Auto-Suggest button samples idle values to recommend a deadzone that masks noise while staying as small as possible.
Step-by-step testing process
- Ensure the controller is connected and awake. Some browsers require a button press to expose gamepad data.
- Open this page and click Detect Controller. The controller name should appear if the browser sees it.
- Choose the deadzone mode: radial for general use, per-axis if one axis has different noise.
- Click Start Test. Let the controller sit untouched for 30–60 seconds to collect idle data.
- Watch the dot — if it moves around while untouched, use auto-suggest to compute a value that would flatten that idle noise.
- Apply the suggested deadzone and re-run the test to ensure the idle values stay within the deadzone and active movement remains responsive.
- Export logs if you want to analyze in Excel or plot the distribution of samples (histograms, rolling averages).
Auto-Suggest algorithm (what it does)
The Auto-Suggest feature collects a short sample of axis readings while the stick is idle and computes a recommended deadzone. For radial mode, it computes the maximum observed magnitude and suggests a slightly larger radius (with safety margin) so normal idle jitter is inside the deadzone but genuine player movement remains outside it. For per-axis mode it suggests separate X and Y thresholds, based on the maximum deviations observed. This tool favors conservative values: it aims to mask noise, not to distort intentional small micro-adjustments.
Choosing a deadzone value — practical guidance
There's no one-size-fits-all number: gaming style and tolerance matter. Here are practical ranges:
- 0.00–0.04 — Minimal: used by competitive players who want maximum responsiveness; only suitable if your controller is very clean and shows near-zero idle noise.
- 0.05–0.12 — Typical: masks light electrical noise and minor offsets; compatible with most players and games.
- 0.13–0.25 — Noticeable: hides larger offsets and wear; small inputs near center are lost — acceptable for casual play but may affect precision aiming.
- > 0.25 — Large deadzone: often a temporary workaround for significant drift or failing joysticks; consider repair or replacement for long term.
Frequently Asked Questions
Q: My controller is slightly off-center but not drifting — should I use deadzone?
A: Use a small calibration offset (if available in your game/controller software) or set a small deadzone (0.02–0.06). Calibration subtracts a steady offset without hiding small intentional movements; deadzone masks values completely inside the threshold.
Q: Does this fix hardware drift?
A: No. This tool only measures and helps you pick a deadzone. Large or worsening drift typically requires cleaning or hardware repair/replacement.
Q: Can I trust Auto-Suggest?
A: Auto-Suggest is a helper — it recommends a conservative deadzone based on sampled idle data. Always test recommended values in the game you play to ensure it feels right.
This tool runs fully in your browser. No controller data is uploaded to any server. For more controller testing tools, visit gamepadtester.com