

Your controller feels off. Maybe the left stick drifts. A button may not respond every time you press it. Or perhaps you’re not sure if something’s actually broken or if you’re imagining it.
This is precisely when you need a gamepad tester. It’s a free tool that shows you precisely what your controller is doing, in real time, with precise measurements. No guessing. No wondering if you’re going crazy.
I’ve used gamepad testers to diagnose dozens of controller issues over the years. Some problems were obvious once I saw the data. Others surprised me completely. Let me show you how to use these tools like a pro.
What Is a GamePad Tester and Why Do You Need One
A gamepad tester is a simple program or website that displays every input from your controller. It shows button presses, stick movements, trigger positions, and d-pad inputs as they happen.
Think of it like a heart monitor for your controller. Instead of guessing what’s wrong, you see the actual data.
What a gamepad tester shows you:
- Exact analog stick positions (down to decimal points)
- How far you’re pressing triggers (0% to 100%)
- Whether buttons register when pressed
- If inputs are happening when you’re not touching anything
- Response time and input lag issues
The best part? Most gamepad testers are entirely free and work right in your web browser. No downloads, no installation, no hassle.
Getting Started: Choosing the Right GamePad Tester

You have several options. Here are the ones I actually use and recommend.
Gamepad Tester (online)
- Just search “gamepad tester” and click the first result from gamepad-tester.com. It works with any controller and any browser. Simple, clean interface that shows everything you need.
HTML5 Gamepad Tester
- Another browser option. Similar features but with a different layout. Some people prefer this one because it shows the button numbers more clearly.
Steam Input Debugger
- If you’re a PC gamer using Steam, this is built right in. Open Big Picture Mode, go to Settings, Controller Settings, and you’ll find diagnostic tools there.
I usually start with the online gamepad tester because it’s fastest. But if I need more detailed information, I switch to Steam’s debugger.
Step by Step: How to Use a GamePad Tester to Diagnose Controller Problems
Let me walk you through the exact process I use every time.
Connect Your Controller Properly
For wired controllers:
- Plug the USB cable directly into your computer. Avoid USB hubs if possible. They can cause connection issues that look like controller problems.
For wireless controllers:
- Use Bluetooth or the official wireless adapter. Make sure the controller is fully charged. A low battery can cause weird input behavior.
Wait a few seconds after connecting. Your computer needs time to recognize the controller.
Open the GamePad Tester
Go to your chosen tester website or program. You should see a controller diagram appear automatically when your gamepad connects.
If nothing shows up:
- Try a different USB port
- Check if the controller works in a game first
- Restart your browser or computer
- Make sure no other programs are using the controller
Perform the Neutral Position Test
This is the most critical first step, and most people skip it.
Here’s what to do:
- Put the controller on a flat surface
- Don’t touch anything
- Look at the analog stick readings
The sticks should read exactly 0.0 (or very close, like 0.02). The triggers should read 0%.
If you see numbers moving when you’re not touching the controller, you’ve found stick drift or a calibration problem. Write down these numbers.
I once tested a controller that showed -0.15 on the left stick at rest. That’s drift. The owner insisted it was fine because it “felt normal” during gameplay. The tester proved otherwise.
Test Each Button Individually
Press every button one at a time and watch the display.
What you’re looking for:
- Does the button light up immediately when pressed?
- Does it stay lit the entire time you hold it?
- Does it turn off immediately when released?
- Do any other buttons light up by mistake?
Press each button 10 times rapidly. If it fails to register even once, you have a problem.
My sons controller had an A button that worked 90% of the time. He couldn’t tell during games because he’d press it again. The gamepad tester showed it clearly, missing about 1 in 8 presses.
Test Analog Stick Range and Dead Zones
Now for the detailed stick testing. This is where gamepad testers really shine.
Move each stick in a complete circle slowly:
- The path should form a smooth circle on the tester
- The stick should reach the edges (1.0 or -1.0 in each direction)
- There shouldn’t be any jumps or skips in the movement
- The center should return to 0.0 when released
Move each stick to the far corners:
Push up and left together. The reading should show something like X: -1.0, Y: 1.0. Try all four corners.
If the stick doesn’t reach the edges, it has a reduced range. If it skips numbers or jumps around, the sensor is failing.
Test Trigger Accuracy with a GamePad Tester
Triggers are analog inputs, meaning they measure how far you’re pressing, not just on/off.
Pull each trigger slowly from 0% to 100%:
- The percentage should increase smoothly
- No sudden jumps
- Should reach 100% when fully pressed
- Should return to 0% when released
I had a racing wheel where the brake pedal only registered up to 87%. I drove for months thinking I needed to adjust my braking technique. The gamepad tester showed me the sensor was broken in two minutes.
Check for Phantom Inputs
Phantom inputs are signals the controller sends when you’re not touching it. These are killers in competitive gaming.
Leave the controller untouched for 30 seconds while watching the tester:
- No buttons should light up
- Stick positions should stay at 0.0
- Triggers should stay at 0%
- D-pad should show no input
If you see random inputs appearing, you likely have:
- Stuck buttons from dirt or spills
- Failing internal components
- Electrical interference from a bad cable
Test Response Time and Input Lag
This is harder to measure precisely, but gamepad testers can give you a general idea.
Press a button rapidly while watching the display. The visual feedback should be instant. If there’s a noticeable delay between pressing and seeing the response, you might have:
- USB connection problems
- Wireless interference
- A dying battery
- Controller firmware issues
Reading and Understanding the Data from Your GamePad Tester
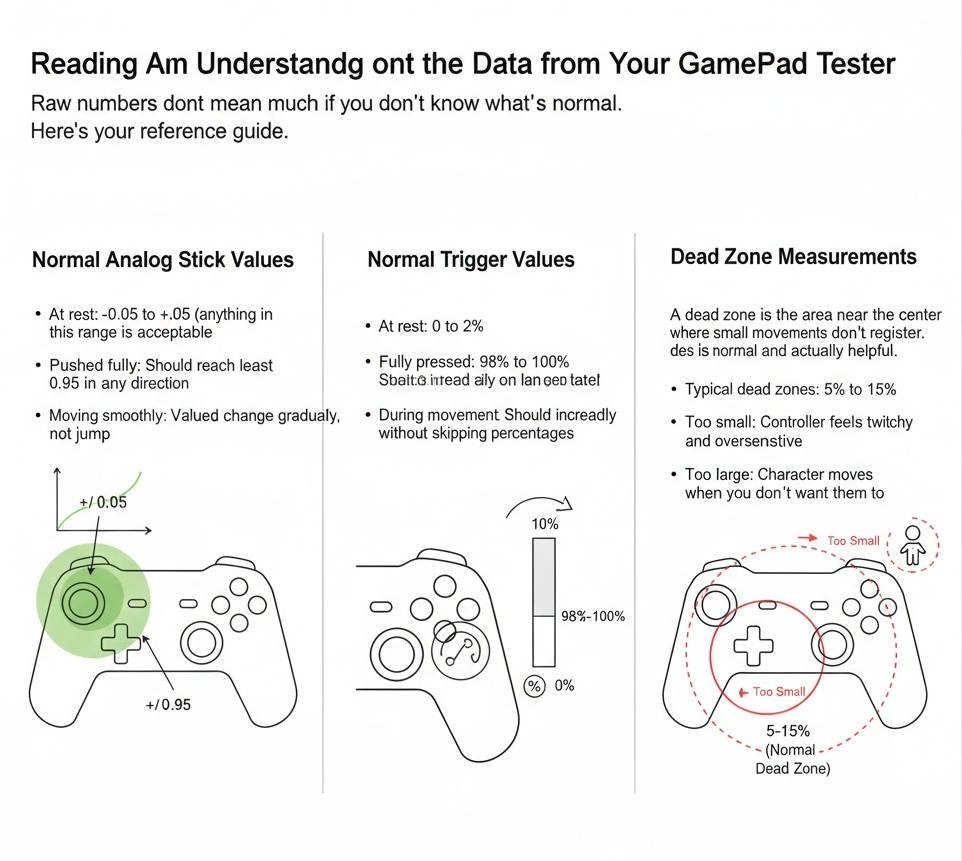
Raw numbers don’t mean much if you don’t know what’s normal. Here’s your reference guide.
Normal Analog Stick Values
- At rest: -0.05 to +0.05 (anything in this range is acceptable)
- Pushed fully: Should reach at least 0.95 in any direction
- Moving smoothly: Values should change gradually, not jump
Normal Trigger Values
- At rest: 0% to 2%
- Fully pressed: 98% to 100%
- During movement: Should increase steadily without skipping percentages
Dead Zone Measurements
A dead zone is the area near the center where small movements don’t register. Some dead zone is normal and actually helpful.
- Typical dead zones: 5% to 15%
- Too small: Controller feels twitchy and oversensitive
- Too large: Character moves when you don’t want them to
You can see dead zones in a gamepad tester by moving the stick very slightly and watching when the numbers start changing.
Common Controller Problems You’ll Find Using a GamePad Tester
Let me show you the patterns I’ve seen hundreds of times.
Stick Drift Patterns
- Consistent drift: Stick always reads 0.15 to the left, even at rest. This is calibration or worn sensors.
- Random drift: Stick position jumps around unpredictably. This is usually an electrical problem or a dying sensor.
- Drift in one direction only: Often fixable with cleaning or calibration.
Button Failure Patterns
- Intermittent response: Button registers 7 out of 10 presses. Usually dirt under the button or a worn contact pad.
- No response: Button never lights up. The contact is completely broken or disconnected.
- Double inputs: One press registers as two. The button is bouncing, or the contact is loose.
Trigger Problems
- Limited range: Only goes to 75%. The sensor is miscalibrated or physically blocked.
- Sticky response: Value increases normally but doesn’t drop back to zero. Something is preventing a full return, usually dirt or a weak spring.
- Erratic values: Percentage jumps around instead of moving smoothly. The potentiometer is failing.
Advanced Diagnostic Techniques with a GamePad Tester
Once you understand the basics, you can dig deeper.
Stress Test
Press multiple buttons simultaneously while moving both sticks and both triggers. Watch for:
- Any inputs that stop registering
- Stick values that change when you press buttons
- Buttons that affect other buttons
This reveals electrical issues and design limitations.
I tested a cheap third-party controller once that couldn’t register more than three buttons at once. The gamepad tester showed the fourth button would cancel one of the first three. That controller was returned the same day.
Temperature Test
Test your controller when it’s cold, then test it again after 30 minutes of intensive gaming.
Some controllers develop problems only when warm. Solder joints can fail, components can expand, and weird electrical issues appear.
Cable Wiggle Test
For wired controllers, move the cable around at the connection point while watching the gamepad tester.
If you see inputs drop out or values change when you wiggle the cable, the internal wiring is damaged. This usually happens right where the cable enters the controller housing.
What to Do After You Diagnose the Problem
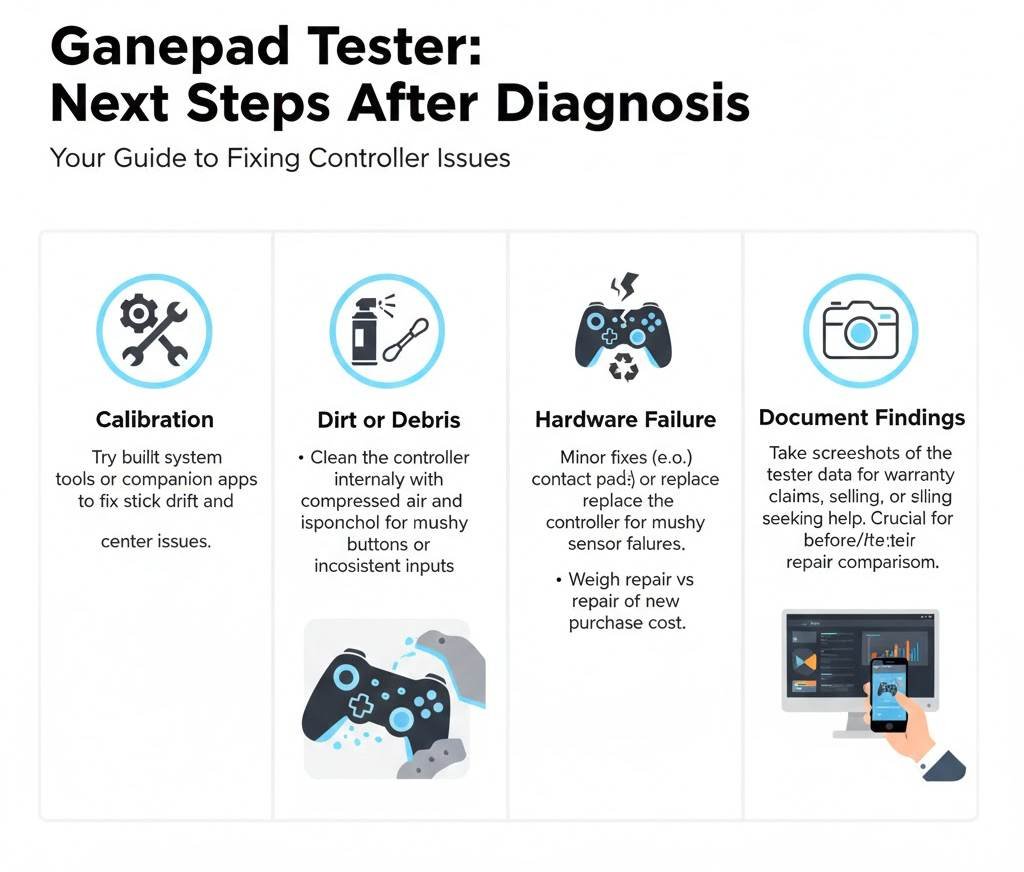
The gamepad tester has given you data. Now what?
If It’s Calibration
Try the calibration tools in your system settings or the controller’s companion app. Many issues can be fixed this way.
If It’s Dirt or Debris
Open the controller and clean it. Use compressed air first, then isopropyl alcohol on a cotton swab for stubborn grime.
If It’s a Hardware Failure
Decide if repair or replacement makes more sense. Minor issues like worn contact pads are easy fixes. Failed sensors usually mean buying a new controller.
Document Your Findings
Take screenshots of the gamepad tester showing the problem. This is invaluable if you’re:
- Filing a warranty claim
- Selling a used controller (be honest about issues)
- Asking for help in forums
- Comparing before and after a repair
Examples from My Testing Experience
A friend complained his Xbox controller had “bad aim” in shooters. He blamed the game, his skills, everything except the controller.
I ran it through a gamepad tester. The right stick had a reduced range, only reaching 0.73 instead of 1.0 when pushed up. He couldn’t make fine adjustments at long distances because the stick couldn’t move through its full range.
Another case: someone insisted their PS5 controller was perfect, but I could see stick drift during gameplay. The gamepad tester showed the left stick resting at 0.08. Barely noticeable, but enough to cause slow camera drift.
The tester doesn’t lie. It shows exactly what’s happening.
Tips for More Accurate Gamepad Tester Results
- Test multiple times: Controller behavior can vary. Run through your tests three times to confirm patterns.
- Use a clean surface: Put the controller on a hard, flat surface for neutral position tests. Soft surfaces can press buttons slightly.
- Close other programs: Other apps using the controller can interfere with test results.
- Check different USB ports: Sometimes the port itself is the problem, not the controller.
- Test with multiple testers: If something looks wrong, try a different gamepad tester to confirm.
Final Line
Gamepad testers remove all the guesswork from controller diagnosis. In five minutes, you know exactly what’s working and what’s broken.
Don’t trust your feelings or assumptions. The data tells the real story.
I’ve saved hundreds of dollars by identifying problems accurately instead of replacing controllers that only needed cleaning. I’ve also avoided wasting time trying to fix controllers that were truly dead.
Every gamer should know how to use a gamepad tester. It’s free, it’s easy, and it gives you information you can’t get any other way.
Next time your controller feels weird, don’t guess. Test it properly and know for sure what’s wrong.